Review Weiss Complete Collection
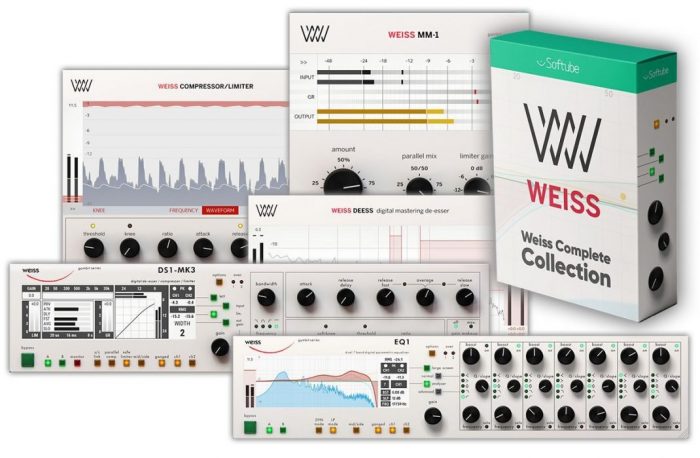
To those who believe these advertising terms sound over the top, the truth is precisely that. Without getting too specific just at this point, the Weiss Complete Collection is excellent and well worth the money. Weiss Engineering and Daniel Weiss have approved and closely collaborated in developing the included plug-ins. Weiss is well known for their high-end audio hardware processing gear in the audio industry for many years. Below I will discuss the 5 plugins I use and mainly work with. Enough of the introductory words – now to the details:
Weiss. It’s the name in audio mastering. Synonymous with sound quality, the value of the Weiss Engineering suite of mastering tools is undeniable. But with premium instruments come premium price tags. This hand-picked bundle allows you to own the gold-standard in mastering gear for pennies on the list price. Take your work to a caliber heard, or rather unheard, on virtually every major record of the past two decades. Created in collaboration with Weiss Engineering, these exactingly modeled plug-ins bring unsurpassed mastering excellence into the DAW-based studio. Compression, limiting, de-essing, mix maximizing, equalizing; get all the essential mastering elements at an exceptional value.

Weiss DS1-MK3
Among this series, my favorite is the Weiss DS1 MK3. A well-known tool that is used by professional mastering engineers worldwide and it is now available as a plugin from original digital hardware.
Both the hardware code and the DS1-MK3 plug-in share the same code. This means that the Weiss DS1-MK3 mastering processor is not a precise emulation; rather, it is the same product with a truly transparent and powerful sound quality. Although it takes some time to get into, the reward is a Weiss sound that is renowned for being very transparent.
So what do you obtain? What is my work process? Very often when I need a bit of compression my starting point is a Bob Katz preset called Parallel Comp – Tonalisation Warmth. Somehow it adds such a beautiful warmth to your mix on your stereo bus. Magic. I recommend adjusting the threshold so that the Gain Reduction is around 1,5db to 2,5db. After that, I would find the perfect spot for the compression, the standard of this preset is at 370hz which is quite a good sweet spot. But you can change this by your taste. The other settings are usually not touched.
Another great preset is called De-ess – Hi Hat – Soft. These days most electronic music has very harsh and digital-sounding highs, especially hats and shakers. To me here is your best problem solver. Just adjust the threshold to 1db- to 3db of gain range and hear how the hats change into „analog“. I would not do more with this preset to me this is enough to change the tonal balance from harsh to warm without losing the highs. Of course, you need to add a bit of highs back but usually, you use the threshold to the amount that’s needed to make it sound „right“.
After all of my suggestions, I would really motivate you to try every preset and play around with the most used parameters like threshold, attack, release, bandwidth, frequency & ratio. This plugin has too many options but when you get used to working with it and know how it works you have one of the very best dynamic processors available. And yes, maybe the best!
Besides that, the plugin includes a new Waveform view that provides additional details about what’s happening in addition to the standard view of the original hardware. You can easily monitor changes in your project and maximize the brilliant sound quality that this processor is known for thanks to the visual feedback.
Yes, Softube does a fantastic job, from the user-friendly UI to its amazing dynamics shaping capabilities. I have already worked with countless mastering plugins based on software and hardware. This tool stands out from the crowd. It sounds so transparent and clean like I’ve never heard before. I’m excited.
Being the same product as the pricier and well-known hardware unit, it’s one of my favorite mastering processors and well worth the money. Strongly advised!
Weiss EQ 1 – The Digital Mastering Precision EQ
The Weiss EQ1 is a digital equalizer plugin developed by Softube in collaboration with Weiss Engineering. The EQ1 replicates the sound of the legendary hardware EQ1-MK2.

What can you expect? A very transparent and precise EQ tool with outstanding sound quality and a very nice resizable GUI to optimize your workflow. I can’t recognize any artifacts which are usually generated by digital EQs. The plugin also offers a very CPU-friendly usage so you can work with several instances, especially during mixing sessions. Mastering engineers, in particular, will appreciate the Weiss EQ1’s linear phase mode, which preserves the phase relationship between different frequencies—a crucial aspect of maintaining the integrity of the original audio. But in some cases, I use the minimum phase mode if I need certain sounds.
Let’s start with GUI which is a feature that has to be mentioned first. I love looking at this GUI all day. Resizable and very sharp, like having the hardware put into your display. You have A/B banks to set 2 different settings for your work on the EQ and choose by your likes which setting you like best. 7 bands are waiting for you to be dialed in and all 7 bands have 5 modes (low & high shelve, bell, low & highpass filter from 6db-12db/octave). In the options folder, you can set your analyzer, screen color, peak reset, dithering, and more.
And now we come to one of my favorite features: the DYN mode in which you can dynamically control the bands and it sounds so natural and unique. I often use this in cases to control low-mids or annoying small bands in the mid-range where it is sometimes better to use dynamic eqs than just a simple multiband-compression. In the advanced mode of the dynamic section, you can control the ratio + attack and release times, too. I am getting more and more used to this, very powerful.
The Weiss EQ1 is in my daily use and here is why: very intuitive workflow with outstanding and precise tonal control, it doesn’t add anything to the signal except the music is getting more defined and „sharp“. It feels like the music gets placed in the stereo field much better when using this EQ. 75% of I am using it in M/S mode which to me is the best scenario in modern mastering workflow these days.
Do you want a quick go-to preset tip? Use the preset Mojo and just tweak the gains and frequencies a bit to your taste. My favorite bands are the lows and highs boosting the gain and the lowmids reducing the gain (from -39db to +18db). Here is where the plugin gets very musical with ultra-high quality. I often get asked by my clients how I get these clear and sharp but not annoying highs into their masters. The answer is Weiss EQ. If you are a friend of another great feature: click on the large screen mode and you can take the dots (frequency points) and just simply drag and drop your EQ curves. This can be also done in the small analyzer display but on the large one, it is a bit more fun to do so.
The EQ1’s sound quality is often praised for its ability to enhance and shape audio without unwanted artifacts or compromising the original vibe and flavor of the sound. Its transparent and musical character makes it a versatile tool for a wide range of audio processing tasks, from being a corrective EQ to a creative tonal shaping box.
Here is a mastering audio example. Master without Weiss EQ VS Master with Weiss EQ.
Low shelve 100hz + 0,5db / Mid Bell 1khz Q 1,2 +0,5db / Mid Bell 2,5khz Q 1,2 +0,5db and High Shelve 6khz +0,8db. Gain -0,4db for exact level match
Even relatively small changes result in a clear improvement in the signal. Undoubtedly, this is the cleanest EQ I have ever worked with. Highly recommended!
Weiss Deess
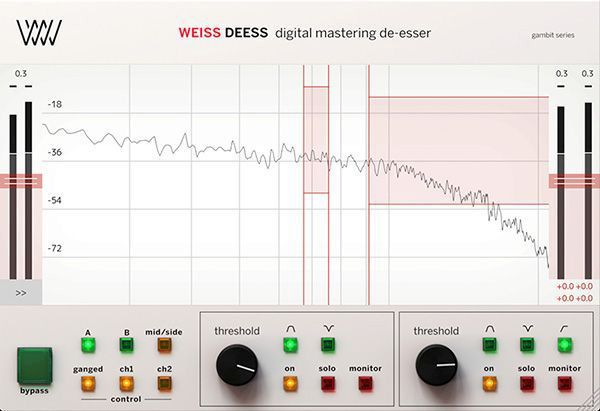
I’ve already tried countless deessers that are supposed to be able to do a lot on the sheet of paper, but in the end, they don’t deliver the decisive sound. Some deessers quickly sound unnatural. Weiss Deess is different here – he delivers exactly the sound you expect.
In addition to two independent frequency bands with different filter models, there are many setting options available, from sidechaining to the response of the de-esser to mid/side processing. It’s great to have two different bands here. For example, the “s” is typically around 7 kHz, while the “ch” and “sh” are typically around 4 kHz and lower. It’s nearly impossible to make it sound awful when compared to other deessers.
Consistently compelling outcomes are achieved.
You can see exactly what i happening the way the waveform expands – cool. The impressive factory presets give you a great impression of what’s possible here and the deesser you normally use on Vocals also works great on other sources like Hi Hats, synths, snares or even sharp bitting 303 acid lines, etc., and also without any artifacts. But this tool works also amazing on the whole mix during the mastering process. Sometimes I use the tool to remove the sharpness in the treble and then turn the treble back in with the Weiss EQ-1. Then you have the same frequency image again – but cleaned up and perfect.
Since there is a kind of advanced feature under the hood with a ton of extra options for modifying the source, I suggest reading the manual here. Yes, you can use this tool to forensically access the troublesome area. Included is a helpful A/B function as well. Since most deessing occurs in the center, I adore using the mid/side control. This way you can keep the sides wide. The monitor function shows me exactly what’s taken away. Yes, I like the clean GUI also.
While other deessers sometimes have weird artifacts, this tool shines with its mercilessly good quality. This unit takes the digital harshness in an impressive way. You can’t go wrong with it. It’s another great Weiss tool that sounds clean, lovely, and smooth.
Weiss MM-1 Mastering Maximizer
The Weiss MM-1 is very simple-to-use maximizer in the best possible quality available in the digital domain these days. But here we go again: Weiss delivers a very nice GUI which is reduced to maximum efficiency. The Maximizer is based on the legendary Weiss DS1-MK3.
There are 5 different styles available. Transparent, loud, punch, wide, and deess. My preferred style for all electronic music genres is in most cases punchy and loud. In some cases wide works perfectly if your track is lacking side signal but you want to increase it with a nice quality spread. Most stereo spreaders damage the stereo image more than they help. The transparent mode comes into play when I do some acoustic stuff but this is rare in my daily business.
So I would advise using a loud or punchy style and start dialing in the amount now from 0-100% and hear what happens. The parallel mix knob is 100% /WET in my workflow most of the time. For example, if you have the wet knob on 50/50 it will blend unprocessed and processed signals in equal parts. To get the average loudness you prefer just push the limiter gain to your likes. You can push the gain very hard like without getting any noticeable distortion.
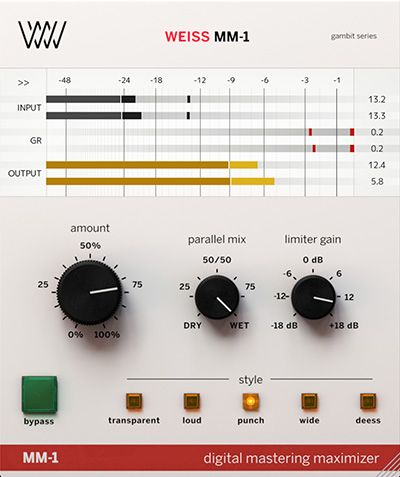
I own so many limiters and maximizers but most of them start sounding distorted while the MM-1 has still some LUFS left. The output gain can be set to -0,1db / -0,2 db and -1,0 db (Apple Digital Masters former Mastered for iTunes).
Finally, I use MM-1 in 80% of my mastering sessions so it became the most used one. Its sound quality and the easy way to use is a kindly advice to download the trial and play around with it. Within minutes you will get to know the differences from other established mastering maximizers.
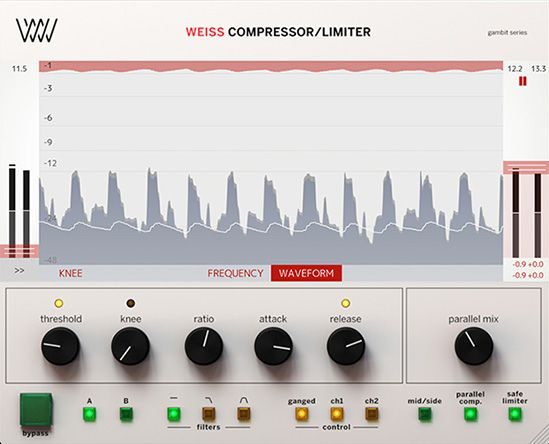
Weiss Compressor / Limiter
This plugin is also part of the DS1-MK3, a well-known Weiss Compressor/Limiter hardware gear that retails for roughly USD 10,000. Since the hardware code was taken straight from the industry standard hardware it has the same sound. You need some experience to set the release parameters in the DS1-MK3 as this section is quite complex. But here the usual parameters are left to make things simple but still with all of the DS1-MK3 sound character. A successful compromise for me.
Five styles2 can be selected: “transparent”, “loud”, “punch”, “wide” and “deess”. I like to work with all the Bob Katz Presets as being a good starting point. I am tweaking around with all parameters first action is setting the threshold then attack and release times following. Next adjusting the parallel mix knob and the knee and ratio amount. Another great feature is to use of external or internal sidechaining to make the compressor not react to low frequencies.
The “amount” parameter sets the maximizer level. Parallel compression is another option. You can easily accomplish your goal because there are only a reasonable number of parameters in the whole thing. This is a pretty simple mix compressor/limiter, and I really like that.
But it works just as well on solo tracks as it does as a mastering compressor. This unit sounds great and is refreshingly transparent. It can also perform multiband. The display is very clear. With the high-resolution images, such as the waveform view and FFT readouts, you can see your work and the impact it’s having more clearly than ever.
It’s just incredible that you can push a track to the right level of loudness without getting weird limiter artifacts. This unit, in my opinion, is one of the few that lets you get such a clear, lovely, and dynamic sound at loud volumes. Additionally, you have more top-tier options than ever before thanks to the addition of two brand-new advanced limiter algorithms (incl the Type 2 true peak limiter) to the Weiss original.
Final Verdict
One of the best mastering tools available is the Weiss Complete Collection. You can get all the necessary elements at a great price, including compression, limiting, de-essing, mix maximizing, and equalizing. These unique plugins sound refreshingly transparent, clean, lovely, and smooth. They stand out from the crowd! Very strongly advised!
Visit my BLOG for other vst recommendations, production tips and more!
Cheers,
Oliver Schmitt aka Sounds of Revolution (SOR)


